طراحی و پیاده سازی نرم افزار
tot00.blogsky@gmail.comطراحی و پیاده سازی نرم افزار
tot00.blogsky@gmail.comزیباتر کردن صفحه، Button و متن - از کتاب Practical WPF Graphics
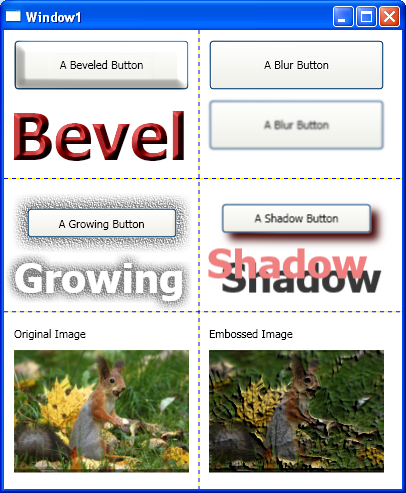
در کد زیر که با XAML نوشته شده است، صفحه به دو ستون و 3 سطر تقسیم شده است. چون ShowGridLines="True" قرار داده است، این باعث شده که خط چین های تفکیک هر سطرو ستون نمایش داده شود. استفاده از EmbossBitmapEffect نیز باعث برجسته شدن تصویر شده است. روش استفاده از Effect و Shadow نیز برای Button ها و متن های در این مثال نشان داده شده است:
3. <Grid ShowGridLines="True">
4. <Grid.ColumnDefinitions>
5. <ColumnDefinition Width="Auto"/>
6. <ColumnDefinition Width="Auto"/>
7. </Grid.ColumnDefinitions>
8. <Grid.RowDefinitions>
9. <RowDefinition Height="Auto"/>
10. <RowDefinition Height="Auto"/>
11. <RowDefinition Height="Auto"/>
12. </Grid.RowDefinitions>
13. <!-- Berel Effect: -->
14. <StackPanel Margin="5" Grid.Column="0" Grid.Row="0">
15. <Button Content="A Beveled Button" Width="175"
16. Height="50" Margin="5">
17. <Button.BitmapEffect>
18. <BevelBitmapEffect BevelWidth="10"
19. EdgeProfile="CurvedIn" LightAngle="45"
20. Relief="0.2" Smoothness="0.5" />
21. </Button.BitmapEffect>
22. </Button>
23. <TextBlock Text="Bevel" FontSize="65"
24. FontWeight="Bold" Foreground="DarkRed">
25. <TextBlock.BitmapEffect>
26. <BevelBitmapEffect/>
27. </TextBlock.BitmapEffect>
28. </TextBlock>
29. </StackPanel>
30. <!-- Blur Effect: -->
31. <StackPanel Margin="5" Grid.Column="1" Grid.Row="0">
32. <Button Content="A Blur Button" Width="175"
33. Height="50" Margin="5">
34. <Button.BitmapEffect>
35. <BlurBitmapEffect Radius="1"/>
36. </Button.BitmapEffect>
37. </Button>
38. <Button Content="A Blur Button" Width="175"
39. Height="50" Margin="5">
40. <Button.BitmapEffect>
41. <BlurBitmapEffect Radius="3"/>
42. </Button.BitmapEffect>
43. </Button>
44. </StackPanel>
45. <!-- Glowing Effect: -->
46. <StackPanel Margin="5,20,5,5" Grid.Column="0"
47. Grid.Row="1">
48. <Button Content="A Growing Button" Width="150"
49. Height="30" Margin="10">
50. <Button.BitmapEffect>
51. <OuterGlowBitmapEffect GlowColor="Gray"
52. GlowSize="15" Noise="1"/>
53. </Button.BitmapEffect>
54. </Button>
55. <TextBlock Text="Growing" FontSize="40"
56. FontWeight="Bold"
57. Foreground="White" Margin="5">
58. <TextBlock.BitmapEffect>
59. <OuterGlowBitmapEffect GlowColor="Gray"
60. GlowSize="10" Noise="0.5"/>
61. </TextBlock.BitmapEffect>
62. </TextBlock>
63. </StackPanel>
64. <!-- Shadow Effect: -->
65. <StackPanel Margin="5,20,5,5" Grid.Column="1"
66. Grid.Row="1">
67. <Button Content="A Shadow Button" Width="150"
68. Height="30" Margin="5">
69. <Button.BitmapEffect>
70. <DropShadowBitmapEffect ShadowDepth="10"
71. Color="DarkRed"/>
72. </Button.BitmapEffect>
73. </Button>
74. <TextBlock Text="Shadow" Margin="3,0,3,13"
75. FontSize="40" FontWeight="Bold"
76. Foreground="LightCoral">
77. <TextBlock.BitmapEffect>
78. <DropShadowBitmapEffect ShadowDepth="20"
79. Color="Gray" Softness="0"/>
80. </TextBlock.BitmapEffect>
81. </TextBlock>
82. </StackPanel>
83. <!-- Embossed Effect: -->
84. <StackPanel Margin="5,10,5,5" Grid.Column="0"
85. Grid.Row="2">
86. <TextBlock Text="Original Image" Margin="5"/>
87. <Image Width="175" Source="1.jpg" Margin="5"
88. Grid.Column="0" Grid.Row="2"/>
89. </StackPanel>
90. <StackPanel Margin="5,10,5,5" Grid.Column="1"
91. Grid.Row="2">
92. <TextBlock Text="Embossed Image" Margin="5"/>
93. <Image Width="175" Source="1.jpg" Margin="5">
94. <Image.BitmapEffect>
95. <EmbossBitmapEffect Relief="0.95"/>
96. </Image.BitmapEffect>
97. </Image>
98. </StackPanel>
99. </Grid>
ش شکل صفحه ای که با استفاده از کد فوق ایجاد شده است به صورت زیر می باشد:
تقسیم کردن صفحه و روی Button تصویر قرار دادن-PracticalWPFGraph
کد زیر که با XAML نوشته شده است، یک صفحه را به 2 سطر و 2 ستون تقسیم کرده است و در هر بخش یک Button قرار داده است و در Background هر Button نیز تصویر قرار داده است:
3. <Viewbox Stretch="Fill">
4. <Grid>
5. <Grid.ColumnDefinitions>
6. <ColumnDefinition/>
7. <ColumnDefinition/>
8. </Grid.ColumnDefinitions>
9. <Grid.RowDefinitions>
10. <RowDefinition/>
11. <RowDefinition/>
12. </Grid.RowDefinitions>
13. <StackPanel Margin="5" Grid.Column="0" Grid.Row="0">
14. <TextBlock Margin="5,5,5,0"
15. Text="TileMode = Tile"/>
16. <TextBlock Margin="5,0,5,5"
17. Text="Unit: Absolute"/>
18. <Button Width="135" Height="100">
19. <Button.Background>
20. <ImageBrush ImageSource="1.jpg"
21. Viewport="0,0,25,25"
22. TileMode="Tile"
23. ViewportUnits="Absolute"/>
24. </Button.Background>
25. </Button>
26. </StackPanel>
27. <StackPanel Margin="5" Grid.Column="1"
28. Grid.Row="0">
29. <TextBlock Margin="5,5,5,0"
30. Text="TileMode = FlipX"/>
31. <TextBlock Margin="5,0,5,5"
32. Text="Unit: Absolute"/>
33. <Button Width="135" Height="100">
34. <Button.Background>
35. <ImageBrush ImageSource="1.jpg"
36. Viewport="0,0,25,25"
37. TileMode="FlipX"
38. ViewportUnits="Absolute"/>
39. </Button.Background>
40. </Button>
41. </StackPanel>
42. <StackPanel Margin="5"
43. Grid.Column="0" Grid.Row="1">
44. <TextBlock Margin="5,5,5,0"
45. Text="TileMode = FlipY"/>
46. <TextBlock Margin="5,0,5,5"
47. Text="Unit: Reltive"/>
48. <Button Width="135" Height="100">
49. <Button.Background>
50. <ImageBrush ImageSource="1.jpg"
51. Viewport="0,0,0.2,0.25"
52. TileMode="FlipY"/>
53. </Button.Background>
54. </Button>
55. </StackPanel>
56. <StackPanel Margin="5" Grid.Column="1"
57. Grid.Row="1">
58. <TextBlock Margin="5,5,5,0"
59. Text="TileMode = FlipXY"/>
60. <TextBlock Margin="5,0,5,5"
61. Text="Unit: Reltive"/>
62. <Button Width="135" Height="100">
63. <Button.Background>
64. <ImageBrush ImageSource="1.jpg"
65. Viewport="0,0,0.2,0.25"
66. TileMode="FlipXY"/>
67. </Button.Background>
68. </Button>
69. </StackPanel>
70. </Grid>
71. </Viewbox>
Tiles in Wpf- از کتاب Practical WPF Graphics Programming
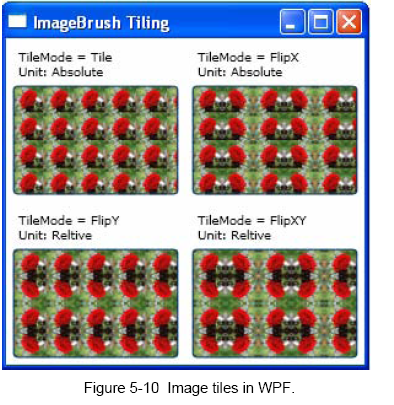
تعریف Tile Mode های مختلفی که در فایل XAML استفاده می شود:
- TileMode="Tile": تصویر را در کل صفحه تکرار می کند.
- TileMode="FlipX": قرینه ی تصویر نسبت به خط عمود را در کنار تصویر مورد نظر قرار می دهد و سپس این تصویر جدید که شامل تصویر مورد نظر و قرینه اش است را در صفحه تکرار می کند.
- TileMode="FlipY": قرینه تصویر نسبت به خط افق را در کنار تصویر مورد نظر قرار می دهد و سپس این تصویر جدید که شامل تصویر و قرینه اش است را در کل صفحه تکرار می کند.
- TileMode="FlipXY": قرینه تصویر نسبت به خط عمود را در کنار تصویر قرار می دهد و دوباره قرینه ی این دو را نسبت به خط افق ایجاد می کند و سپس این تصویر جدید را در کل صفحه تکرار می کند.
برای واضح تر شدن توضیح های فوق، در شکل زیر هر یک از موارد فوق نمایش داده شده اند:
تعیین سطر و ستون های صفحه - از کتاب Practical WPF Graphics Progr
اگر این کد را در فایل XAML داشته باشیم یعنی صفحه را به 2 ستون و 3 سطر تقسیم کرده ایم:
- <Grid.ColumnDefinitions>
- <ColumnDefinition/>
- <ColumnDefinition/>
- </Grid.ColumnDefinitions>
- <Grid.RowDefinitions>
- <RowDefinition>
- <RowDefinition />
- <RowDefinition/>
- </Grid.RowDefinitions
استفاده از تصویر در فایل XAML
وقتی در فایلXAML می خواهیم تصویری را نمایش بدهیم، باید فایل مربوط به آن تصویر در مسیر پروژه کپی و به پروژه Include گردد.